

"Oh the Places We'll Go!" Zoo Animal Balloon Nursery Frame
- darlingdanadesigns
- Aug 14, 2021
- 10 min read


I've got a sweet spot for baby things. My cousin recently had a little baby boy and I've made him so. many. things. It's funny to see the evolution of a design- this nursery window box originally was going to be a mobile. When she said she got a mobile- I was like, okay, plan B! And I think I like Plan B even better!
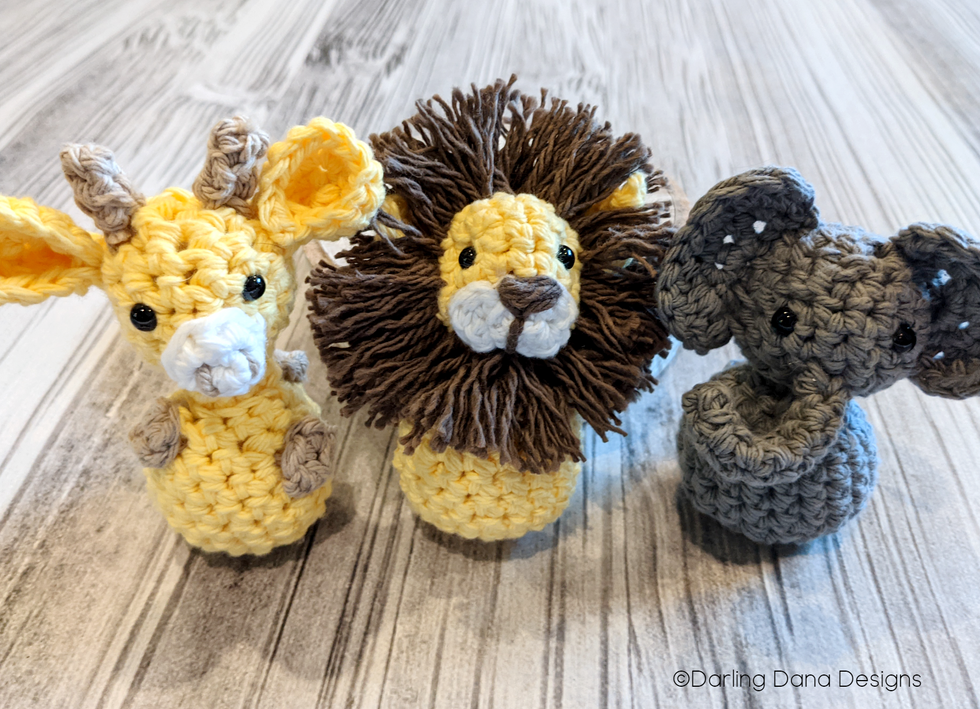
I'm already thinking of other versions of this that I could make! I did have a fourth animal when I was planning on making it a mobile. It was a Panda and it was the scariest. panda. ever! Good thing I only needed 3 animals for my photo box!
I visited them last weekend and she hung it up in his nursery over his crib- it just makes my heart so happy to see that. While I was holding him, I caught him looking at it and my heart swelled! (I mean- I know he can't tell me he likes it but I'm taking that to mean he does! I hope he's ready for me to make him all the things for the rest of his life!)
Happy Crocheting!
~Dana

Baby Zoo Balloon Window Box
Materials:
3.5 mm hook
Weight 4 Yarn- Use worsted DK
Balloon Yarn- I used Lion Brand 24/7 Cotton in Blue Grey, Navy and Ecru)
Basket Yarn- I used Sugar ‘n Cream in Jute
Giraffe – I used Sugar ‘n Cream in Country Yellow, Soft Ecru and white
Lion- I used Sugar ‘n Cream in Country Yellow, White and Warm Brown
Elephant- I used Sugar ‘n Cream in Stonewash
Yarn Needle
Button Eyes- I purchased a kit on Amazon (you can find the same set here)
Window Box – I got mine at woodpeckerscrafts.com – 11” x 14” Unfinished Wood Tray Frame
Optional- Paint for window box (I used white acrylic paint)
Optional- Wooden Name cut out- I got mine from Vivify Home Design on Etsy – I got the Small Name Wood Sign 1.5 x 5” (It came unfinished and I painted it white)
Optional- Twine – I liked this better for my balloon basket string but you can use the same yarn as the baskets instead.
Optional - Photo Backdrop- I searched for free images on google and printed it in the 11” x 14” size after editing the text on the backdrop.
Optional – Glue to attach backdrop and balloons to photobox (I used hot glue and Gorilla Spray Adhesive)
Abbreviations:
CH- Chain
ST – Stitch
SC – Single Crochet
HDC - Half Double Crochet
DC – Double Crochet
SL ST – Slip Stitch
Balloons:
Color 1
Magic Circle
Row 1: In magic circle; Ch 2, 11 hdc in circle, sl st to join. (11 hdc)
Row 2: Ch 2, dc in first st, sk next stitch, ch2, 2 dc in next st
Row 3: Ch 4 (1 dc and ch 2), 3 dc in next ch 2 sp, ch 2, sk 2 dc, 3 dc in next ch 2 sp, rep to end, 2 dc in last ch 2 sc, sl st to starting chain.
Change color (Color 2) reattach in ch space next to sl at st from last row.
Row 4: Chain 2(counts as dc), 2 dc in next ch 2 sp, ch 1, *sk 1 dc, 2 dc in next st, ch 1, sk next st, 3 dc in next sp, ch 1, sk 1 dc, 2 dc in next ch 1* rep from * to end, sl st to join
Row 5: Ch 3 (counts as 1 dc and ch1), 2 dc in next ch 1 sp, ch 1, sk dc group, *2 dc in next sp, ch 1, sk dc group, rep * around, 1 dc in last ch and sl st to join.
Row 6: Ch 2 (counts as dc), 2 dc in sp, ch 1, *sk dc group, 3 dc in next sp, ch 1* to end. Sl st to join
Change color (1) reattach in sl stitch space from previous row
Row 7: Ch 3 (counts as dc ch1) 2 dc in next sp, ch 1, sk dc group, 2 dc in next sp and each sp around 1 dc in last sp, sl st to starting ch.
Row 8: Ch 2(counts as dc), dc in sp, ch 1, sk next dc group, 2 dc in next sp, ch 1, rep to end. Sl st to join
Row 9: Ch 2(counts as dc), sk dc, 2 dc in sp, repeat around, dc in last sp, sl sl to starting ch. *Note there are no chaining between dc in this row- it acts as a decrease.
Change color (2) Reattach in ch so after slip st from prev row
Row 10: Ch 2 (counts as dc), 1 dc in same sp, skip next sp, 2 dc in the next sp, rep to end, sl st to starting chain.
Row 11: Ch 3 (counts as dc and ch 1), skip 2 dc group, 2 dc in next sp, ch 1, rep to end, 1 dc in next sp and sl st to join.
Row 12: Ch 2, sk sp,1 dc in next 2 dc, *skip sp, 1 dc in next 2 dc, rep from * to end, sl st to join.
*Finish Off. Sew in ends.
Basket:
Row 1: Magic circle, 6 sc in circle, sl st to join.
Row 2: Ch 1, 2 hdc in each st around (12 hdc) sl st to join.
Row 3: Ch 1, 2 hdc in each st around (24 hdc) sl st to join.
Row 4: Ch 2, dc in blo in ea st around (24 dc) sl st to join.
Row 5: Ch 2, dc in each st across (24 dc) sl st to join
Row 6: Ch 1, hdc in st, *ch 1, sk next st, hdc in next, rep * rep around.
*Finish Off. Flip inside out for more stability (The BLO row will create a “ledge”)
Elephant:


Body: (In Grey)
Magic Circle
Row 1: 6 sc in magic circle, sl st to join (6 sc)
Row 2: Ch 1, 2 sc in each st around, sl st to join (12 sc)
Row 3: Ch 1, 1 sc in next st, 2 sc in next, rep around, sl st to join (18 sc)
Row 4-7: Ch 1,1 sc in each st around, sl st to join (18 sc)
Row 8: Ch 1, 1 sc in next, decrease in next 2, rep around (12 sc)
*Stuff
Row 9: Ch 1, decrease each across (6 sc)
*Finish off, stuff, and sew closed and weave in ends.
Head: (In Grey)
Magic Circle
Row 1: 6 sc in magic circle, sl st to join (6 sc)
Row 2: Ch 1, 2 sc in ea st around, sl st to join (12 sc)
Row 3: Ch 1, 1 sc in next, 2 sc in next, rep across, sl st to join (18 sc)
Row4-5: Ch 1, 1 sc in ea st across, sl st to join (18 sc)
Row 6: Ch 1, *sc in next, decrease, rep from * around sl st to join (12 sc)
*Stuff – add eyes
Row 7: Ch 1, *sc in next, decrease, rep from * around, sl st to join (8 sc)
Row 8: Ch 1, decrease in each st around (4 sc)
*Finish off, stuff and sew Closed- leave long tail for attaching to body.
Nose: (in Grey)
Ch 8
Row 1: Sc in the second chain from the hook and in each chain across. At the end of the row, start working along the other side of the chain row. 2 sc in the first chain, 1 sc in each stitch across.
*Fold in half, slip stitch both rows together
Finish off and leave one long end for attaching to head.
Ears: (make 2) (in Grey)
Ch 2
Row 1: Sc in 2nd ch from the hook, 3 more sc in same st (4 sc)
Row 2: Ch 1, 2 sc in each st across (8 sc)
Row 3: Ch 1, hdc in st, 2 dc in next 2 st, 1 dc in next, sl st in next 2, dc in next st, 2 sc in next 2, 1 dc in next, sl st in same st.
Finish off. (Leave long tail.)
Assembly:
· Attach head to body and sew together
· Position ears on either side of the head (ensure eyes are centered). When you sew your ears to the elephants head, pull them together so they curve in a little bit.
· Attach nose below and centered to the eyes. Sew around base of trunk.
Finish off. Weave in ends.


Giraffe
Body: (In yellow)
Magic Circle
Row 1: 6 sc in magic circle, sl st to join (6 sc)
Row 2: Ch 1, 2 sc in each st around, sl st to join (12 sc)
Row 3: Ch 1, *1 sc in next st, 2 sc in next, rep from * around, sl st to join (18 sc)
Row 4-7: Ch 1, 1 sc in each st around, sl st to join (18 sc)
Row 8: Ch 1, *1 sc in next, decrease in next 2, rep from * around (12 sc)
*Stuff
Row 9: Ch 1, *2 sc in next, decrease, rep from * around sl st to join, (9 sc)
Row 10: Ch 1, hdc in blo each across, sl st to join (9hdc)
Row 11: Ch 1 sc in each st across, sl st to join (9 sc)
Row 12: Ch 1, 2 sc in each st across, sl st to join (18 sc)
Row 13-14: Ch 1, sc in each stitch across, sl st to join (18 sc)
Row 15: Ch 1, *sc in next stitch, dec in next, rep from * to end (12 sc)
Row 16: Ch 1, *sc in next stitch, dec in next, rep from * to end (8 sc)
*Stuff and add eyes here
Row 17: Ch 1, dec in each stitch across.
Finish off, stuff and sew closed- sew in ends.
Nose: (In White)
Magic Circle
Row 1: 3 sc in Magic Circle
Row 2: 2 sc in each stitch (6 sc)
Finish Off- leave long tail to attach to head.
Ears: (Make 2) (in yellow)
Magic Circle
Row 1: 4 sc in Magic Circle, sl st to first st (4 sc)
Row 2: Ch 1, 2 sc in each stitch, sl st to first st ( 8 sc)
Row 3: Ch 1, sc in next 2 st, 2 sc in next 4 st, sc in next 2 st, sl st to first st (12 sc)
Finish off, leave long tail at end to attach to head.
Horns: (Make 2) (in taupe)
Ch 3
Row 1: Sc in second chain from the hook and the following chain (2 sc)
Row 2: Working alongside the back of the first row- in the chains- 2 sc in first chain, sc in next (3 sc)
Row 3: Fold in half and slip stitch together two stitches that line up
Finish Off, leaving long tail at the end to attach to head.
Spots: (Make 3/as desired) (in taupe)
Sc 4 in magic circle.
Finish Off leaving long tail at end to attach to body.
Assembly:
· Attach nose to face below and centered with the eyes. Stitch around the outer row and pull tight to get it to push out.
· Using taupe and your yarn needle, sew two lines into nose for “nose holes”
· Position horn on top of the head- line up with eyes- sew around the base and pull tight.
· Position ears on either side of the horns, slightly to the side.
o Before attaching, Sew base of the ear together so it curves in on itself.
o Sew into head leaving a them to hang a little. *Don’t sew so tight that they stick up straight like the horns.
· Place your spots on desired places on the giraffe body- sew around the last row of each spot. (Don’t pull too tight or the spots will pull on the body)


Lion
Body: (in yellow)
Magic Circle
Row 1: 6 sc in magic circle, sl st to join (6 sc)
Row 2: Ch 1, 2 sc in each st around, sl st to join (12 sc)
Row 3: Ch 1, 1 sc in next st, 2 sc in next, rep around, sl st to join (18 sc)
Row 4-7: Ch 1, 1 sc in each st around, sl st to join (18 sc)
Row 8: Ch 1, *1 sc in next, decrease in next 2, rep from * around (12 sc)
*Stuff
Row 9: Ch 1, decrease each across (6 sc)
*Finish off and sew closed, weave in ends.
Head: (in yellow)
Magic Circle
Row 1: 6 sc in magic circle, sl st to join (6 sc)
Row 2: Ch 1, 2 sc in ea st around, sl st to join (12 sc)
Row 3: Ch 1, *1 sc in next, 2 sc in next, rep from * across, sl st to join (18 sc)
Row 4-5: Ch 1, 1 sc in ea st across, sl st to join (18 sc)
Row 6: Ch 1, *sc in next, decrease, rep from * around sl st to join (12 sc)
*Stuff and add eyes
Row 7: Ch 1, *sc in next, decrease, rep from * around, sl st to join (8 sc)
Row 8: Ch 1, decrease in ea st around (4 sc)
*Finish off, stuff and sew closed- leave long tail for attaching to body.
Ears (Make 2) (in yellow)
Ch 2
Row 1: Sc in second chain from hook, turn (1 sc)
Row 2: 3 sc in previous row (3 sc)
Row 3: ch 1, 2 sc in first stitch, 1 sc in next, 2 sc in last stitch (5 sc)
Finish off, leaving long tail at end to attach to head.
Face Piece (in white):
Chain 4
Row 1: Sc in second chain from the hook, and in each chain to end, sc along the backside of the chain, 3 sc in first chain, slip stitch in center chain and 3 sc in last chain, slip stitch to start sc to join.
Finish Off, leave long tail at end to attach to head.
Assembly:
· Attach head to body and sew together
· Position ears on either side of the head (ensure eyes are centered). When you sew your ears to the Lions head, pull them together so they curve in a little bit.
· Attach face piece below and centered to the eyes. Sew around outer row but be careful not to pull too tight on the outer edges.
· Using Brown and your yarn needle- you will add the nose and mouth.
o First create a “T” for the nose. The top of the “T” is the top of the nose. You will then make the edges of the nose by sewing lines between the sides of the “T” and the base of the “T” creating and upside down triangle. Fill in with additional yarn as necessary.
o You will now create an line that goes from under the nose to the base of the white face piece. At the bottom of that line you will do an upside down lower case “m” for the mouth.
Mane (in brown)
· Cut 4-5” pieces of brown yarn for the mane.
· Using your yarn needle, pull the yarn through from one side of the head to the other (directly across) *You will be doing this in front of the ears and body.
· Once satisfied with the amount of yarn (You’ll need quite a few!)Brush out the yarn- it will separate and unravel. This makes it look more like hair.
· Trim to desired length and ensure even throughout.
Frame Assembly:


These directions are if you would like to assemble your pieces to create a window box.
Ready Photo box- I painted mine white with acrylic paint.
Ready name cutout- I painted mine white with acrylic paint
Cut Photo Backdrop to fit interior of box. I used Gorilla Spray Adhesive to attach to the back of the photo box.
**Ensure this is dry before attaching the balloons.
Position Balloons in place on backdrop. Using hot glue, attach balloons to photo box.
Using twine or yarn, attach baskets to balloons. (*I did not glue my baskets to the backdrop. They stay in place but you can glue them if you’d like)
Using hot glue, attach the name cutout in the desired location.
Insert Animals and you’re done! (I did not glue the animals into the baskets either- I thought it would be fun to be able to pull them out but you can glue or sew them in if you’d like)


Comments